Gallery Wall Inspiration for You!

What's not to love about a great gallery wall? They can be created in all shapes and sizes and can seriously brighten up any room by becoming its focal point. Gallery walls are timeless; they can show family growth and even reflect your character. What I love most about Gallery Walls is that they often tell a story-- YOUR story!
If you are considering a fun way to add meaning to your favorite room or space, look no further! Today, we are going to create a beautiful gallery wall together.
Okay, so I know what you are thinking: Easy for you to create. You're a photographer! That much is true, but with these helpful tips I am going to share, you will be creating your own beautiful gallery walls in no time at all. So, hey, YOU….yeah YOU! I’m talking to you over here. I want you to stop overthinking, get out of your own head, and just try some of these easy tips and tricks before you get started.
Whenever I am creating a gallery wall, I always start by choosing my favorite photograph(s). For me (and most) that’s the easy part. You know your family’s faces, lines of expression, and exactly what tugs at your heartstrings better than anyone out there, so trust your gut and go ahead and find that special pic or pictures that warm your heart. As you can see, my first tip is to select what you want to show off. I just adore these two images, so I’ll use these. Their expressions are priceless, and I love their closeness. To me, it’s like what Olaf calls a warm hug.

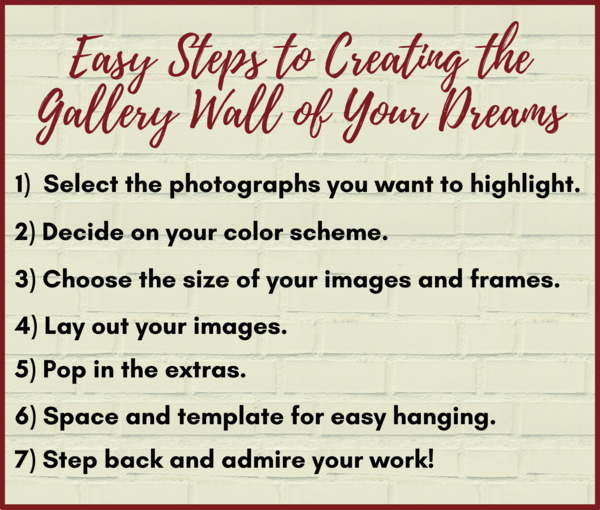
#1 Select Photograph(s) you Want to Highlight
Now that you have that all sorted out, let's go ahead and look at the colors in those photographs and also the wall space where you would like to see them highlighted.
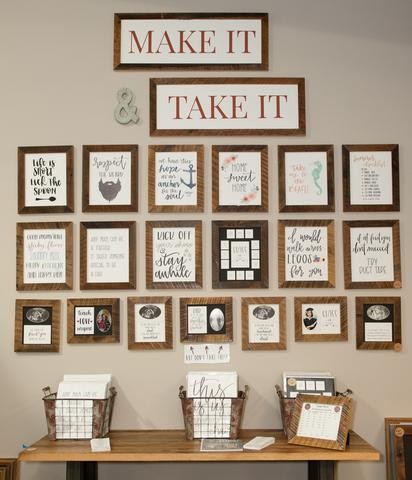
Today, we are going to transform the MAKE IT, TAKE IT wall at our Rustic Red Door warehouse into a newly designed Gallery Wall. Here is what we are working with: the space is rather large so when I stand back I can see that I have a fair amount of flexibility for my spacing and design. In addition, I can see the overall theme is rustic, and I have some darker metal mixed with reclaimed oak barn wood. This still leaves a great deal of freedom of color, and that is exactly where I am going to make these photos pop.
#2 Design Your Color Scheme
First, let’s recap. We picked our favorite photographs, we examined our space, and now we are choosing the color scheme. See that? We are moving right along!
That leads me to my second tip, picking a color scheme. My suggestion is for you to take a few steps into your room or space where you are planning to create this gallery wall. Give the room a nice long glance. What type of furniture do you have? What colors are in the room? Is there a defining pattern or theme you are already trying to portray in your space? If you can answer any of those questions, then perfect! This will make picking the color scheme as easy as counting 1, 2, 3. If not, even better! You have a clean slate and can create your theme or mode from scratch just by adding one or a few photographs to get you started.
For my gallery wall’s color scheme, I love the red in this family’s outfits and can see they would look amazing in our red reclaimed oak frames. (All the red found at the Rustic Red Door warehouse is an added bonus!) I also love the dark metalwork in our furniture so I am also going to keep that running throughout this display by choosing a mix of both red and black reclaimed frames with black mats. Honestly, could there be anything more perfect for our Rustic “RED” Door theme of hospitality?
#3 Choose the Size of Your Images and Frames
My third tip is to choose the size of your photographs based on the size of your space. (Size does matter when planning a gallery wall.) So before I go any further, I want to look at my space and measure. Since I’m a "Go Big or Go Home" kinda gal and have an awesome amount of space, I am going to be very liberal with the size of my images by blowing them up larger to make an even more dramatic statement.
Try to use matching frames for a cleaner look, or if you like varied frames, coordinate them to give a more eclectic -but aesthetically pleasing- look.
#4 Lay Out Your Images
Once you have your images in the size you want framed, go ahead and lay them out on the ground. Here’s another cool tip: I like to measure and, if possible, outline the dimensions with tape on the ground so you can clearly see how much space you have available. By doing so, you know exactly how much space you have to work with.
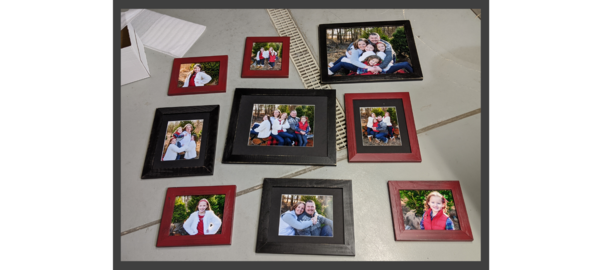
Next, go ahead and lay out your images to get a good feel for how they would look on the wall. My suggestion is to always start with your largest images. In my case, the largest image is a 16x20 followed by a framed 11x14 image in a 16x20 frame. Once I have those placed, I move the next largest framed images around, followed by placing smaller prints and frames.
After I lay out my images I always take a few steps back and look at my work. This is something I encourage after every frame. Then, I feel free to move the images around and add in frames when needed to fill space. I’m sure what you have looks amazing, but if you aren’t exactly satisfied, keep playing until you are.
When I stepped back from my first layout above, I found that it was lacking something. I like this layout so much more.
However, from this image, you can see that I have more room to add to my display.
#5 Pop in the Extras
Now for the pièce de résistance, I’m going to pop in a couple of awesome verses. Fortunately for me, I have a really incredible hand lettering artist, Jen, at my disposal, so I am going to have her whip up a few things to fill in the 2 blank 8x10 frames. If I didn’t have Jen I might consider making my own or maybe buying a cool mirror instead.
(I also really love large decorative letters. When I use them I use only the first letter of my client’s last name. They always look awesome on a wall, while adding more character and dimension to the story.)
Another suggestion is to mix framed photographs with different artwork that coordinate with your other framed wall art. This is one place where there is lots of freedom to be creative, and I challenge you to do just that.
#6 Create Spacing and Template for Easy Hanging
This next part is a little daunting, I know. Simmer down. I haven’t misguided you yet, so I am sure this will help you and not leave you sweating.
We are ready to start hanging your awesome gallery on the wall. Deep breaths and don’t fret. I have a really cool tip that will make this process go super easy and simple. I would be lying if I didn’t share that I have placed my share of unnecessary holes in the wall trying to figure this out myself. So let me take the guesswork out of it for you.
I am all about working smarter, not harder these days, LOL.
First, you will need to lay out craft paper (or a roll of paper you buy at the dollar store) on the floor, taping your seams together.
Now, place your frames on top of the paper in the exact layout you choose.
Next, measure the space between your frames and make the measurements precise and identical between each frame while they are on the paper. I recommend a ruler, but if that seems like a challenge, make a guide that is the exact size. (You could even find something such as the spine of a book or a small block of wood to make things even.)
Once they are spaced perfectly, trace each frame with a pen or pencil onto the paper underneath.
Flip each frame over and measure where the nail would fit onto the sawtooth hanger and draw an X on the paper inside each of the rectangles you just traced.
Once they are all drawn, lift the frames and there you have it: a neatly drawn template ready to place on your wall.
Using frog tape or painter's tape and a level, affix your new paper template onto the wall where you are hanging your gallery.
Hammer your nails right through the paper where you marked.
Once you have all your nails in place, pull the paper off, and place your frames in their places.
TaDa!! There you have it! Step back and admire your beautiful work!
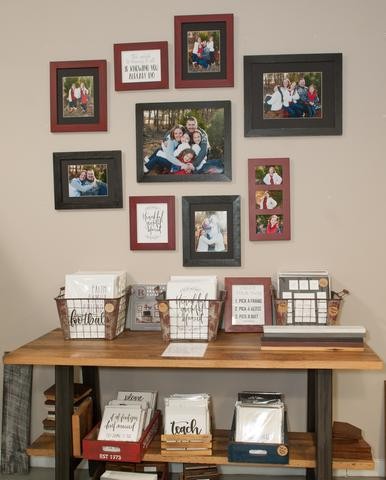
Here's my finished product. I left a precise amount of room for a decorative letter on the right side of it and plan to fill that gap soon. Wow, I love it!!
We hope you find these six simple tips helpful and easy. We can’t wait to see what you do in your homes.
If you need help with choosing frames or want Jen to create a beautiful, framed verse for your story, be sure to check us out at Rustic Red Door!